How to service your suspension fork's lower legs
A 30-50 hour service interval keeps your fork plush and your stanchions from scoring. Here is how we run a lower-leg service in our workshop, the tools we reach for, and the torque values we hit on reassembly.
On this page
Your fork manufacturer publishes a service interval in the 30-50 hour range for a reason. After 50 hours of trail time, the bath oil in the lower legs is contaminated with stanchion dust and seal debris, the foam rings are no longer holding lubricant against the stanchions, and the dust seals have started letting fines past. Skipping a lower-leg service does not make the fork explode; it makes the stanchions wear into the bushings, and once that happens, the fix is no longer a 90-minute service. It is a damper rebuild plus a new lower-leg assembly.
A lower-leg service is the highest-leverage suspension job a home mechanic can do. The damper internals stay sealed, the air spring stays sealed, and the only thing you are touching is the oil bath that lubricates the bushings and the seals that contain it. Done on time, it gives back the plushness that a tired fork has been hiding.
When to service
The published 30-50 hour interval is a calendar guide. In our workshop the trigger is whichever comes first:
- Time on the bike. 30-50 hours of riding for most trail forks. Heavier riders, wetter conditions, and longer descents pull the interval shorter. Dry-climate XC riders can stretch it.
- Visible oil weep on the stanchions above the wiper seals after a ride. A faint ring is normal; a smeared streak is a service notice.
- The fork sucks down through its travel. Healthy lower-leg lubrication keeps the stanchions sliding freely; a dry fork rides harshly on small bumps and feels "stuck" off the top of its travel.
Whichever signal hits first, that is the service moment. Past 100 hours without a lower-leg service, the foam rings are dry, the bath oil is sludge, and you are accelerating wear on parts that were not meant to wear yet.
What you will need
The tool stack for a fork lower-leg service:
- Bike clamped in a repair stand. A wall- or bench-mounted clamp is fine for this work; our Wall or Bench Mounted Repair Stand with Pro Shop Quick Release is the version we use when bench space is tight.
- A way to drain the bath oil cleanly. We use the Stainless Steel Suspension Sink so the spent oil ends up in one drain trap, not on the bench.
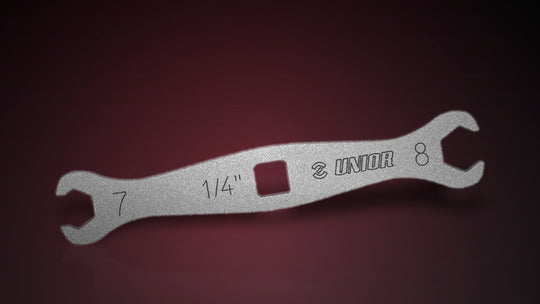
- Top-cap socket. Modern fork top caps are soft aluminum with shallow flats; a standard chamfered socket rounds them. Our Flat Socket for Suspension Forks is made without the chamfer so it bites the full face.
- A handle that matches the socket. The Pro Socket Handle is a compact 1/2" drive option that fits the flat sockets and saves bench space.
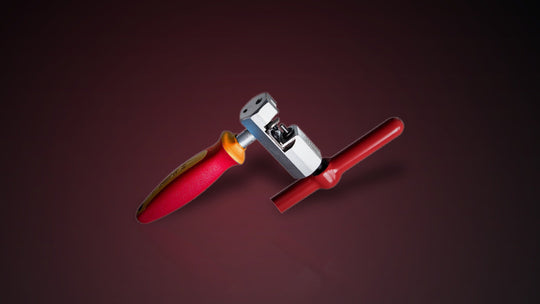
- Strap wrench for any threaded collar the flat socket cannot reach, including air-can collars when you continue into a full service. Our Strap Wrench 1705/2DP-US has a rubberized strap and a forged handle.
- Dust seal removal tool. Pulling a dust seal with a screwdriver scars the lower-leg counterbore every time. The Fork Dust Seal Remover lifts the seal cleanly.
- Seal driver matched to your stanchion diameter. The seal has to seat square in its bore at the right depth. The Suspension Fork Seal Installation Guide 1702 ships in five sizes; the Fork Seal Driver Bundle is the seven-driver kit that covers 30 mm through 40 mm in one purchase.
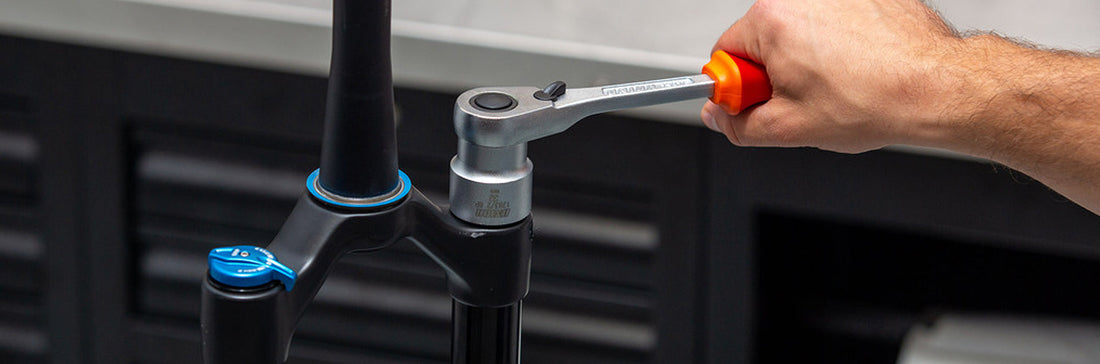
- Torque wrench. Lower-leg foot bolts and top caps have published torque values. We use the Electronic Torque Wrench 1 to 20 Nm for the small fasteners and the Electronic Torque Wrench 4.2 to 85 Nm for anything above 20 Nm.
- The complete kit. If you are buying one tool to handle the full service in one go, our Suspension Service Set 2.0 bundles the flat socket family, the seal drivers, the strap wrench, and the small workshop bits that the service needs.
You will also need fork-specific consumables that your manufacturer publishes: lower-leg bath oil at the specified weight, the correct foam rings, replacement dust seals matched to your fork model, and the air-spring shaft seals if you are taking the full service further into the air-spring assembly.
Preparing the bike and fork
- Note the air pressure on the air spring. Write it on tape on the crown. You will set the fork back to this number on reassembly.
- Release the air pressure fully from the air-spring side.
- Clamp the bike in the repair stand by the seatpost or a frame tube, never by the dropper, with the front wheel removed and the brake caliper unbolted from the lower leg and tied back to the frame.
- Wipe the stanchions and the lower-leg uppers with a clean rag. You are about to expose the oil bath; whatever dust is on the stanchions ends up inside the lowers.
Removing the lower legs
- Bottom out the fork by hand or by pulling the lowers down onto the air-spring shaft pin.
- Loosen the rebound foot bolt and the air-spring foot bolt at the bottom of each lower leg. Torque values on reassembly are critical; for removal, finger-loose is enough.
- Crack each foot bolt slightly so the shaft inside the lower leg drops free, then drain the bath oil into the sink. A tap on each foot bolt with a soft-faced mallet helps release a shaft that has stuck to the bottom-out bumper.
- Slide the lowers off the stanchions in one motion. The dust seals and foam rings stay in the lowers; the stanchions stay attached to the crown and steerer.
Cleaning and inspection
Pour any remaining oil out of the lowers. Wipe the inside of each lower leg with a clean rag; bath oil contamination is dust-sized, and a final wipe with an isopropyl rag removes what the drain leaves behind. Inspect the bushings inside the lowers for visible play or scoring; if the bushings are scored, the service is no longer a home job and the fork needs a service-center bushing replacement.
Wipe the stanchions clean. Look for pitting, hard scratches, or scoring. Light surface marks are normal; a deep score that catches a fingernail is a stanchion replacement, not a seal swap.
Replacing the dust seals and foam rings
This is the section where the seal driver earns its keep.
- Lift the old dust seal out of each lower leg with the Fork Dust Seal Remover. Do not pry with a screwdriver.
- Pull the old foam rings out from beneath each dust seal and discard.
- Soak the new foam rings in lower-leg bath oil. They need to be saturated before they go back in.
- Press the new dust seals into place with the seal driver sized to your stanchion diameter. The driver pushes the seal square in the bore at the published depth; pushing by hand or with a generic socket lets the seal cock and leak.
- Seat the saturated foam rings beneath each dust seal.
Reassembly and bath-oil refill
- Slide the lowers back over the stanchions, careful not to roll the new dust seals on the way in.
- Add the manufacturer-specified bath-oil quantity per lower leg through the foot-bolt holes. Quantities are published per fork model; do not estimate.
- Reinstall the foot bolts. Torque to your manufacturer's spec; there is no universal foot-bolt torque, and overtightening cracks the lower-leg casting. The electronic torque wrench shines here because foot bolts sit in a recessed casting where a beam wrench cannot reach.
- Reinstall the brake caliper and front wheel. Re-set the air-spring pressure to the number you wrote on tape.
Torque and final checks
Foot bolts, top caps, and brake caliper bolts all have published torque values. We hit them with the 1-20 Nm wrench for the foot bolts and the 4.2-85 Nm wrench for the brake-caliper mounts. Cycle the fork ten times through its travel by hand to seat the new seals; the first cycles will feel slightly stiff while the foam rings finish absorbing oil.
Wipe the stanchions and look for oil weep. None should appear. A clean fork after the first ten cycles is a good service.
Cheat sheet
| Step | Tool | Notes |
|---|---|---|
| Drain bath oil | Suspension Sink + foot bolt loose | Catch in the sink trap, not the floor |
| Pull top cap | Flat Socket + Pro Socket Handle | Standard sockets damage soft top caps |
| Remove lowers | Soft mallet on foot bolts | Pull lowers off stanchions in one motion |
| Remove dust seals | Fork Dust Seal Remover | Never pry with a screwdriver |
| Install dust seals | Seal driver matched to stanchion | 30 mm, 32 mm, 34 mm, 35 mm, 36 mm, 37 mm, 40 mm covered by the bundle |
| Soak foam rings | New rings in bath oil | Saturate before reinstall |
| Refill bath oil | Per manufacturer spec | Quantity varies by fork model |
| Torque foot bolts | Electronic Torque Wrench 1-20 Nm | Overtightening cracks the casting |
Pro tip from our mechanics
The most common mistake we see on home fork services is reusing the foam rings. They look intact when they come out; they are not. A foam ring that has done 50 hours is permanently compressed, no longer holds bath oil against the stanchion, and the fork is dry within the first ride after the service. Buy the foam rings every time you do this job. They cost less than the bath oil and they are the reason the service exists.
Past lower-leg service interval, the next maintenance target is the air-spring shaft seal; same tool family, same workflow logic, longer interval. The Suspension Service Set 2.0 we reach for on bench is the kit that covers both.